Categories
Blog Code Snippets PHP

Send E-mail with Attachment using PHP

Here’s a perfectly working snippet of PHP code which will send an e-mail with an attachment (of any file type).

This code has been updated to disable jumbled/garbage/corruption which showed up on gmail (while it was fine on Outlook).

//File settings
$fileatt = "../uploads/myLovelyFile.pdf";
$fileatttype = "application/octet-stream"; //Octet-stream is a file type to allow all types of files
$fileattname = "myLovelyFile";

//Read file contents
$file = fopen($fileatt, 'rb');
$data = fread($file, filesize($fileatt));
fclose($file);

//Prepare file contents for e-mail
$semi_rand = md5(time());
$mime_boundary = "==Multipart_Boundary_x{$semi_rand}x";
$data = chunk_split(base64_encode($data));

$subject = "My Lovely Subject";

$mainMessage = "Hello,"
. "

This is my lovely message."
. "
Please see the attached file."
. "

Best Regards,"
. "
Kim";

$from = "Sandy Sender ";

$to = "Randy Recipient ";

$headers = "From: $from" . "\r\n";
$headers .= 'Reply-To: dispatcher@sender.com' . "\r\n"; //Optional
$headers .= "BCC: barbara@blindcopy.com\r\n"; //Optional

$headers .= "MIME-Version: 1.0\n" . "Content-Type: multipart/mixed;\n" . " boundary=\"{$mime_boundary}\"\n";
$headers .= "Importance: High\n"; //Optional
$message = "This is a multi-part message in MIME format.\n\n" . "–{$mime_boundary}\n"
. "Content-Type: text/html; charset=\"iso-8859-1\n"
. "Content-Transfer-Encoding: 7bit\n\n" . $mainMessage . "\n\n";

//Attach file to e-mail
$message .= "–{$mime_boundary}\n"
. "Content-Type: {$fileatttype};\n" . " name=\"{$fileattname}\"\n"
. "Content-Disposition: attachment;\n" . " filename=\"{$fileattname}\"\n"
. "Content-Transfer-Encoding: base64\n\n" . $data . "\n\n" . "-{$mime_boundary}-\n";

// Send the email
mail($to, $subject, $message, $headers);


Categories
Blog Code Snippets

Add Checkmarks to your Unordered List Items

You have a regular unordered which shows with bullet points just like this:

HTML:

<ul>
 	<li>Apples</li>
 	<li>Oranges</li>
 	<li>Grapes</li>
</ul>

Result:

  • Apples
  • Oranges
  • Grapes

The bullet points are ugly and the check marks would be so much more relevant. Here’s how to turn the bullet points into checks.

First, add a class like checkmark to the ul tag which will indicate when the checks should be applied.

HTML:

<ul class="checkmark">
 	<li>Apples</li>
 	<li>Oranges</li>
 	<li>Grapes</li>
</ul>

Next, add your CSS:

ul.checkmark {
  list-style: none;
  margin-left: 25px;
}

ul.checkmark li {
  line-height: 1.8;
  position: relative;
}

ul.checkmark li:before {
  color: #781fd7;
  content: '✓';
  font-weight: bold;
  left: -25px;
  position: absolute;
}

Here’s your result:

  • Apples
  • Oranges
  • Grapes
Categories
Blog Code Snippets PHP Wordpress

Add a new widget area to a WordPress theme

If you are familiar with WordPress themes then you know that a lot of themes have a widgetized sidebar. This means that you can add, remove, and re-order widgets on your WordPress website by using the “widget” section of your WordPress dashboard.

Having a widgetized sidebar is very useful, but you may want to widgetize other parts of your WordPress theme as well. This is very easy to do, and once your theme is modified it will be simple for you, or the WordPress administrator, to swap widgets in and out of different parts of the website.

Step 1: Add code to theme
The first step is to add the following line of code to the part of your theme that you want to widgetize. Be sure to change “Name of Widgetized Area” to a name that makes sense for you. You will need to do this with a code editor and then upload the file via a FTP client.

<?php
if ( is_active_sidebar( 'custom-header-widget' ) ) : ?>
    <div id="header-widget-area" class="chw-widget-area widget-area" role="complementary">
    <?php dynamic_sidebar( 'custom-header-widget' ); ?>
    </div>
    
<?php endif; ?>

Step 2: Edit functions.php
In your WordPress theme folder, there should be a functions.php file. If there isn’t, just make a new file and name it “functions.php”.

In the functions.php file, add the following code:

function wpb_widgets_init() {
    register_sidebar( array(
        'name'          => 'Custom Header Widget Area',
        'id'            => 'custom-header-widget',
        'before_widget' => '<div class="chw-widget">',
        'after_widget'  => '</div>',
        'before_title'  => '<h2 class="chw-title">',
        'after_title'   => '</h2>',
    ) );
}
add_action( 'widgets_init', 'wpb_widgets_init' );

The code above should be wrapped in PHP open and close(<?php and ?>, respectively) tags. If you already have a functions.php file those tags will already be there. If you created one yourself you will have to add them.

Make sure to change the name of the function (in this case it is “Name of Widgetized Area”) so that it matches the name you gave it in step 1.

The ‘before_widget’ and ‘after_widget’ parameters allow you to specify what code you would like to put before and after each widget. In this case I put a div with an class for styling purposes.

The ‘before_title’ and ‘after_title’ parameters allow you to wrap the widget titles in code. In this case I wrapped the title in <h3> and </h3> tags respectively.

Step 3: Adding Widgets
Once you have successfully added the widgetized area, you can start adding widgets to your WordPress site. To do this, log into your WordPress dashboard, then click on Widgets in the Appearance dropdown on the left side.

You should now see the “Name of Widgetized Area” section on the right side of your screen.

Now just click and drag widgets into the box just like your sidebar!

Categories
Blog Code Snippets

Default Value for Submitting Forms using “Get”

I have this form I’m working on for a client which transmits data to another site for scheduling and processing. The form needs to use the “get” method where all of the values are assigned as part of the url.

The sending URL looks like this:

https://kimberleydurrant.com?ZIP=12345&PRODUCT=2&QUANTITY=4

ZIP = 12345
PRODUCT = 2
QUANTITY = 4

The issue is that one value (zip code) when left empty, like this:

https://kimberleydurrant.com?ZIP=&PRODUCT=2&QUANTITY=4

The zip code parameter takes the values next to it.
ZIP = &PRODUCT=2

There is a solution!

It needs just a bit of jquery. Override the form submit event and check for a null value. If null, set to a default value like five zero’s. Then submit the form normally.

jQuery("#myForm").submit(function(e){
  e.preventDefault();
  if(jQuery("#zip").val() == '') {
    jQuery("#zip").val('00000');
  }
  this.submit();
});
Categories
Code Snippets Wordpress

Customize any Form on WordPress using CSS

Have you installed a contact form plugin for WordPress and found the default layout is entirely boring?

I’ve been there! The default layout comes with a very little or absolutely no css formatting.

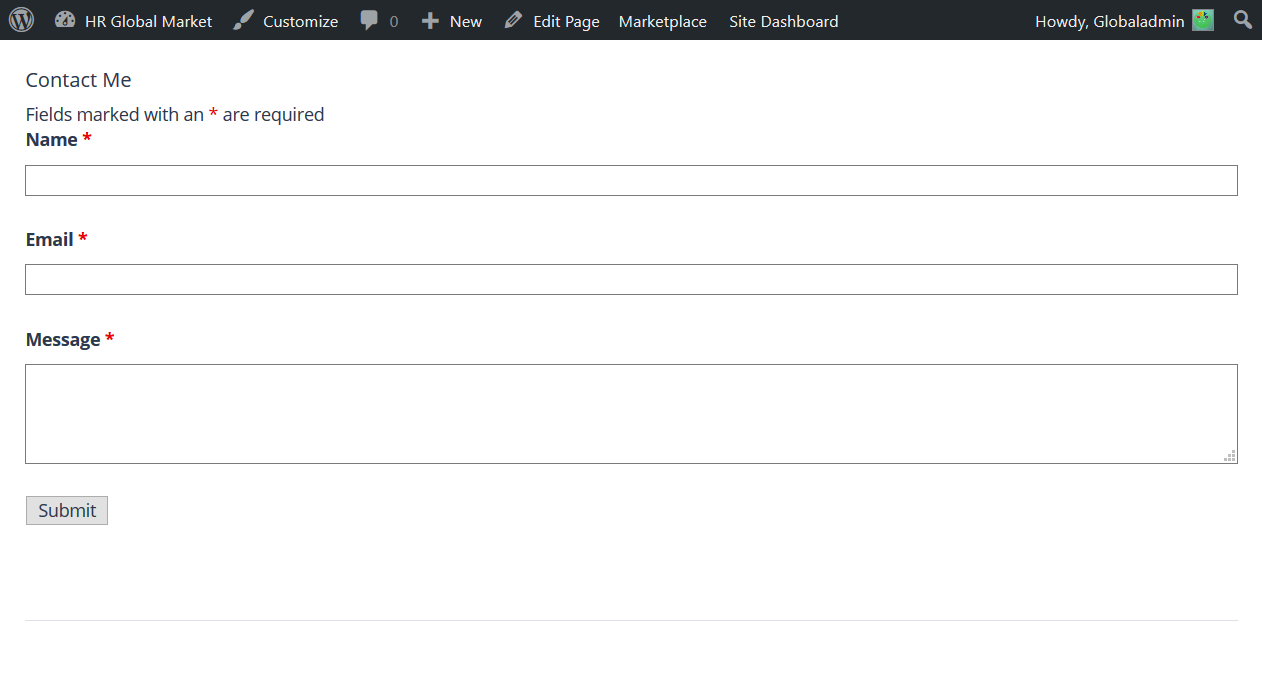
Below is the default layout for Ninja Forms.

Contact Form - Before Applying CSS

Luckily, I was able to write a snippet of code which will resolve that.

The Solution to Customizing any Form on WordPress using CSS

This snippet can work on any contact form for WordPress; including of course Contact Form 7 and Ninja Forms. Just copy and paste into your custom css editor. Some themes will come up with this editor which you can find in the WordPress Admin section under ‘Appearance’. If your theme doesn’t come with it, download and install Simple CSS and JS which will work perfectly well.

input, select, textarea {
  border-radius: 3px;
  color: #666;
  font-size: 17px;
  padding: 8px;
}


/* Reduce the textarea size to 80 pixels */
textarea {
  height: 80px;
}


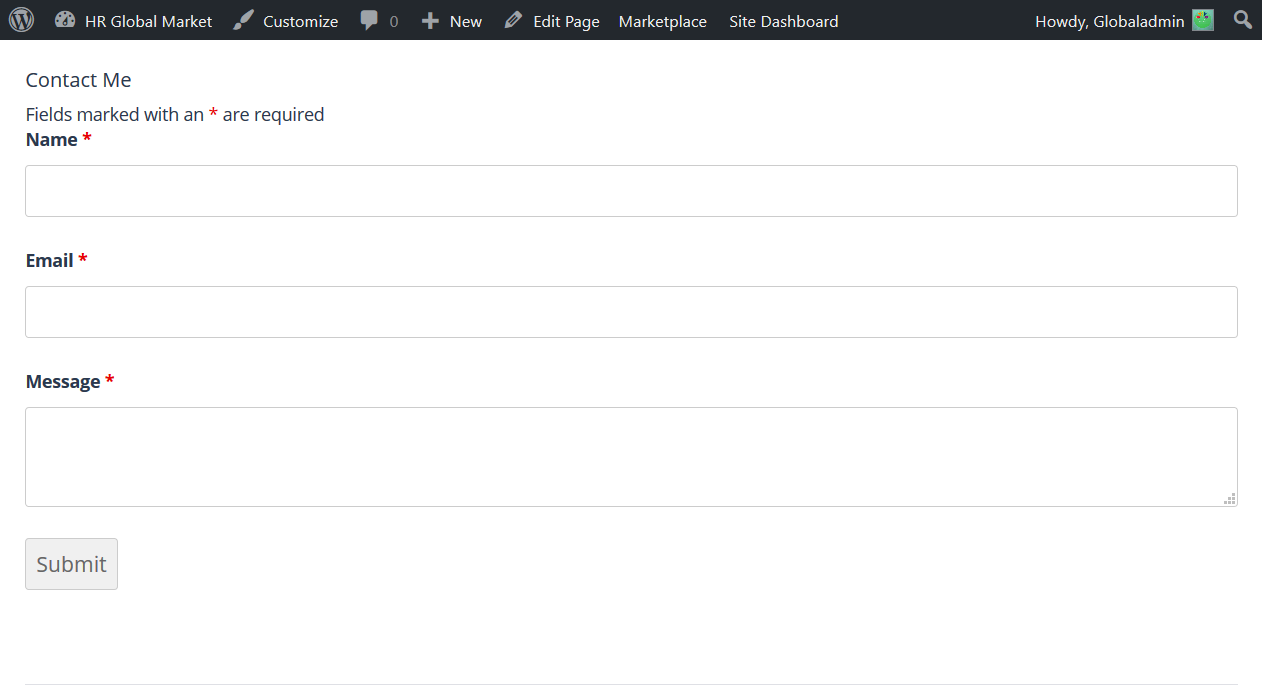
Contact Form - After Applying CSS

There you have it! A nice sleek modern looking form created by adding just a few lines of CSS.

Categories
Code Snippets

Remove PHP Mail Special Characters in Subject Field

Let’s say you’d like to insert special characters in the subject of HTML e-mails sent with the PHP mail() function.

You have an email subject which when extracted from my database looks like this..

Coffee &amp; Laptop

Sample code..

$to = 'me@example.com';
$subject = 'Coffee &amp; Laptop';
$message = 'HTML message...';

$headers = 'MIME-Version: 1.0' . "\r\n";
$headers .= 'Content-type: text/html; charset=utf-8' . "\r\n";
$headers .= 'From: Me <me@example.com>' . "\r\n";

mail($to, $subject, $message, $headers);
Ofcourse, you won’t want the &amp; symbol showing when the email is sent to your client.

Add this line to change the html entities to the proper values:

$subject = '=?UTF-8?B?'.base64_encode($subject).'?=';

Your code becomes:

$to = 'me@example.com';
$subject = 'Coffee &amp; Laptop';
$subject = '=?UTF-8?B?'.base64_encode($subject).'?=';
$message = 'HTML message...'; 
$headers = 'MIME-Version: 1.0' . "\r\n"; $headers .= 'Content-type: text/html; charset=utf-8' . "\r\n"; $headers .= 'From: Me <me@example.com>' . "\r\n"; mail($to, $subject, $message, $headers);
Here’s what the end user sees as the subject when they receive the email:

Coffee & Laptop

Categories
Blog Code Snippets

CSS Media Queries for Mobile Devices

Writing CSS for different devices can be a pain in the ass. With Media Queries it’s easier, if you know how to pin point a specific device.

This can help you pin point a specific mobile device from within your CSS. Copy the code and paste it into you CSS file and get crackin’!

/* Smartphones (portrait and landscape) ----------- */
@media only screen
and (min-device-width : 320px)
and (max-device-width : 480px) {
/* Styles */
}

/* Smartphones (landscape) ----------- */
@media only screen
and (min-width : 321px) {
/* Styles */
}


/* Smartphones (portrait) ----------- */
@media only screen
and (max-width : 320px) {
/* Styles */
}


/* iPads (portrait and landscape) ----------- */
@media only screen
and (min-device-width : 768px)
and (max-device-width : 1024px) {
/* Styles */
}


/* iPads (landscape) ----------- */
@media only screen
and (min-device-width : 768px)
and (max-device-width : 1024px)
and (orientation : landscape) {
/* Styles */
}


/* iPads (portrait) ----------- */
@media only screen
and (min-device-width : 768px)
and (max-device-width : 1024px)
and (orientation : portrait) {
/* Styles */
}


/* The New iPad (iPad 3) ----------- */
@media only screen
and (min-device-width: 1536px)
and (max-device-width: 2048px)
and (-webkit-min-device-pixel-ratio: 2) {
/* Styles */
}


/* iPhone 4 ----------- */
@media
only screen and (-webkit-min-device-pixel-ratio : 1.5),
only screen and (min-device-pixel-ratio : 1.5) {
/* Styles */
}


Categories
Blog Code Snippets

Vertically Align Anything with Just 3 Lines of CSS Code

Have you to vertically align an element and it just won’t work.

vertical-align: middle; claims to do the trick but it won’t apply to every situation.

.element {
  position: relative;
  top: 50%;
  transform: translateY(-50%);
}

That’s all you need! It works straight out of the box, even in Internet Explorer 9.